 SidebySpeak
 Blog
Live Captions in Chrome: Enable, Disable, and Fix Them
To get live captions Chrome can show for any video or audio, open Chrome, go to Settings, select Captions (older versions list it under Accessibility), and switch on Live Caption. Play something with...
To get live captions Chrome can show for any video or audio, open Chrome, go to Settings, select Captions (older versions list it under Accessibility), and switch on Live Caption. Play something with speech and a caption box appears at the bottom of the window. Switch the same toggle off to stop it. If nothing shows up, update Chrome and check the language setting first.
The trouble is that the feature hides in settings, behaves differently across versions, and fails quietly. You press play, nothing appears, and no error tells you why. It also has hard limits. It captions audio played inside Chrome, but it will not caption your own microphone or save a transcript, and its language and translation options are limited.
This guide walks through four steps: turning Live Caption on, adjusting or turning it off, fixing it when captions do not appear, and adding an extension when the built-in tool is not enough. SidebySpeak is a Chrome and Edge extension built for live translated captions in meetings, so we cover where an extension fits and what to check before you install one.
What Chrome Live Caption does and what you need
Live Caption is a feature of desktop Chrome that turns spoken audio from a browser tab into text on your screen. It works on YouTube videos, podcasts, web video, and the audio of a browser-based meeting.
What it captions, and what it skips
Chrome generates the text with speech recognition that runs on your device, so audio and captions stay on your computer. Chrome downloads the speech files the first time you turn the feature on.
It only hears audio that plays in Chrome. Music in a desktop app, a call in a native app, and your own voice through the microphone are all outside its reach. On Android, captions come from the phone's system Live Caption through the volume controls, not from a Chrome setting.
What you need before you start
Check these four things before you open Settings:
- A desktop version of Chrome on Windows, Mac, or Linux, updated to the latest release
- An internet connection for the first-time download of speech files
- Audio in a language that Chrome's caption settings list
- A personal browser profile, since managed work or school profiles can block the feature
Live Caption captions what plays inside Chrome, nothing else, and that single rule explains most "it's broken" reports.
Step 1. Turn on Live Caption in Chrome
You can turn Live Caption on from Settings or from the media controls. Settings is the reliable route, and the media controls are the fast one.
Turn it on from Settings
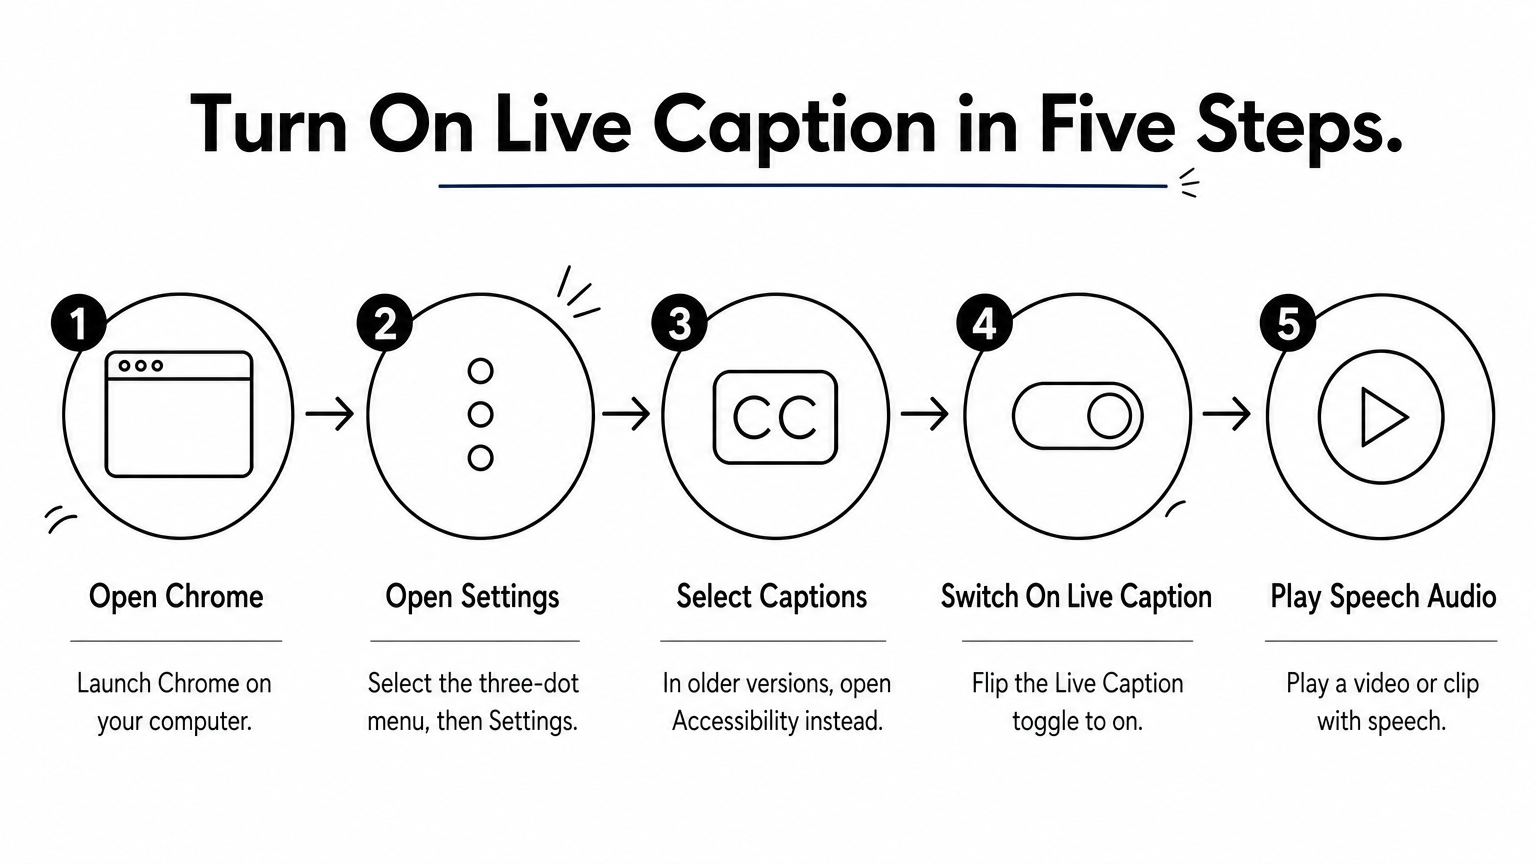
- Open Chrome on your computer.
- Select the three-dot menu at the top right, then Settings.
- Select Captions. In older versions, open Accessibility instead.
- Switch on Live Caption.
- Play a video or audio clip with speech.
You can also paste chrome://settings/captions into the address bar to jump straight to the page. The first time, Chrome downloads the speech recognition files, so give it a few seconds before you decide it failed.
Turn it on from the media controls
When a tab plays audio, Chrome shows a media icon in the toolbar. Open it and use the Live Caption toggle inside the panel. This is the quickest way to flip captions on during a meeting or video without leaving the page. Chrome does not offer a dedicated keyboard shortcut for the toggle, so this icon is as close as you get.
Open Settings, then Captions, then switch on Live Caption, and play audio to see the box appear.
Step 2. Adjust or turn off captions
To turn Live Caption off, return to the same toggle in Settings, then Captions, and switch it off. The media panel toggle does the same thing. Changing the language and the look of the box takes one extra visit to the same page.
Turn Live Caption off
Switching the toggle off stops captions in every tab and ends the feature until you enable it again. Closing the caption box only hides it for the moment, so use the toggle when you want the feature fully off. If you plan to run an extension for captions, turn Chrome's version off too so you do not get two caption boxes stacked over the video.
Change the language and appearance
On the Captions page, pick the caption language that matches the speech you are watching. The list depends on your Chrome version, and a mismatch between spoken and selected language is a common cause of garbled or empty captions. The same page has a link to caption style settings, which are handled by your operating system, where you can change text size and color. On the screen, drag the caption box to move it out of the way of on-screen text.
Match the caption language to the spoken language before you troubleshoot anything else.
Step 3. Fix captions that do not show
When captions do not appear, the cause is almost always an outdated Chrome, speech files that have not finished downloading, a language mismatch, or audio that is not playing in Chrome. Work down this table from the top.
Match the symptom to the fix
| What you see | Likely cause | Fix |
|---|---|---|
| No Live Caption option in Settings | Old Chrome version, or a managed device | Update through Menu, Help, About Google Chrome, then relaunch. On a work device, ask your admin. |
| Toggle is on but no box appears | Speech files not downloaded yet | Stay online, wait a minute, then toggle off and on |
| Box appears but stays empty | Language mismatch or no audible speech | Set the caption language to the spoken language and raise the volume |
| Captions work in some tabs only | Audio is not playing inside Chrome | Open the video or call in a Chrome tab |
| Many wrong words | Music, accents, or low volume | Use a clean audio source and turn up the volume |
Know the limits before you blame the setup
If the table does not solve it, you may be asking Live Caption for something it cannot do. It will not caption a native desktop app, and it will not caption your own voice through the microphone. It also keeps no transcript, so you cannot review the call afterward. Those gaps, not bugs, are the usual reason people move to an extension.
Update Chrome, toggle the feature off and on, and confirm the audio plays in a Chrome tab. That fixes most cases.
Step 4. Add a captions extension when Chrome falls short
Use an extension when you need translation, captions for your own microphone, or a transcript you can keep. Chrome's built-in tool is free and private, but it does one job.
Compare built-in captions with an extension
| Need | Chrome Live Caption | SidebySpeak extension |
|---|---|---|
| Captions for tab audio | Yes | Yes |
| Captions for your microphone | No | Optional |
| Translation | Limited | 60 languages, shown beside the original speech |
| Transcript | None to save | Saved in your browser profile, with download or email |
| Cost | Free | 20 free minutes a month, then paid plans |
Check these things before you install any captions extension
Extensions that read tab audio need broad permissions, so be careful. Look for:
- A clear statement of where audio is sent, and whether it is retained
- Support for your meeting platform (Google Meet, Zoom, or Teams in the browser)
- Pricing that matches how many minutes you use
- No bot that joins the call, if you do not want other attendees to notice
Set up SidebySpeak on a call
SidebySpeak runs in Chrome or Edge with no meeting bot, so nothing joins the call. Install the extension from sidebyspeak.com, sign in, open your browser call, and press Start. Turn on the optional microphone if you want your own speech captioned and translated too. Tab and microphone together count as one minute of usage.
Here is a worked example. A weekly 45-minute meeting adds up to about 180 minutes in a four-week month. That is far beyond the 20 free minutes, so the free plan only suits a trial. The Basic plan at $9.99 per month includes 10 hours, or 600 minutes, which covers it with room to spare. Saved transcripts stay in your browser profile, not on the company's servers.
Use Chrome's built-in captions for English video, and an extension when you need translation, microphone captions, or a transcript.
Getting captions running
Turn on Live Caption from Settings, then Captions, and play audio in a Chrome tab. Turn it off with the same toggle. If captions fail, update Chrome, match the language, and confirm the audio plays inside Chrome. Past that point, you have hit the limits of a built-in tool that only captions browser audio and keeps no record.
When your meetings run in a language you do not fully speak, or you want a transcript, an extension fills the gap. You can try SidebySpeak with 20 free minutes a month on your next browser call and see whether translated captions beside the original speech help you follow along.